Feeds:
Posts
Comments

Posts Tagged ‘recipe’

Out of all of the things I’ve posted on in this blog, the copycat Stouffer’s Vegetable Lasagna post continues to be the most popular one. I get a few messages every year, asking about the recipe, even though that post is eight years old.

So here it is!

2020-03-14 18.05.04

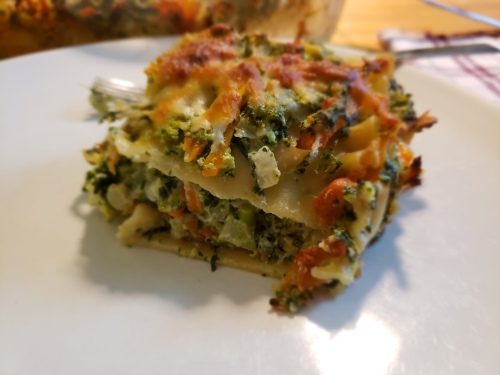
Slice of my copycat Stouffer’s vegetable lasagna

I don’t even need to follow a recipe for this anymore, and I’ve made it my own. It’s a forgiving dish. It’s been nearly a decade since I’ve eaten Stouffer’s Vegetable Lasagna, since I can’t find it where I am. For those that don’t know, this is a pre-prepared frozen creamy vegetable lasagna you get in grocery stores, either as a full tray or in individual slices, and it is delicious! I think that the store-bought version has fewer vegetables and maybe more cream/cheese sauce. Remember – it tastes yummy partly because they use the salt, butter, and cheese we’re often afraid to use as home cooks. Since I’m a mom now and I’m trying to stuff as much fresh vegetables into my family as possible, I overload the vegetables.

I do love cheese, but we eat a lot of it regularly, so that is part of the reason why I reduce the amount of cheese here. I’ve also found that, personally, even in more traditional lasagna dishes, I prefer less grated cheese. Grated cheese makes the lasagna heavier and chewier. All of those melted cheese strings hanging around everywhere get messy. It also reheats into leather that is difficult to cut and eat. I’d rather have a creamier texture here.

This recipe doesn’t have to be exact, which is why my measurements will be estimates. And it’s a copycat – I made it up myself based on the ingredient list on the back of the box and how I remembered the original tasting. Sometimes I have more broccoli, sometimes I have frozen spinach instead of fresh. Sometimes I make it using my original copycat recipe of 5 cheeses, sometimes I barely use any cheese at all. It just depends on your taste. Right now, my preference is for a ton of fresh vegetables and less cheese. The grated cheese tends to make it heavier, and chewier. But I’ll write out the two rough recipes, so you can pick which one you prefer.

“‘healthy mom’ version – more veggies, less cheese”

~3 T. butter. Ok if more.

2 T. flour

2 c. milk or half and half (10% cream in Canada)

1 Knorr bouillon cube, either chicken or vegetable, chopped

Dash onion powder

Dash garlic powder

1 garlic clove, crushed

1 small onion, diced

2 c. broccoli, diced

2 c. baby spinach

2 c. carrots, julienned

1/2 – 2/3 c. ricotta

1/4 c. parmesan, grated

1/4 c. romano, grated

1/4 c. mozzarella, grated

lasagna noodles (I use 9 for a long casserole dish)

Herb Parmesan Shake’n Bake

-maybe a tad more butter for the topping

Salt and pepper


0. Preheat oven to 375F.

1. In a big pot, cook the lasagna until it’s molto al dente, or still kind of crunchy inside but about halfway cooked. For me, that’s 6 minutes. Remove from water, run under cold water to stop the cooking process and put aside. Either put them on a plate or work quickly so the noodles don’t curl, dry out too much, or get stuck together.

2. Melt butter in a sauce pan on low heat. Can use some of that melted butter to grease the casserole dish.

3. Add onion to soften. If you don’t want to do this step, you can a) cut onion smaller or even grate it; b) use a red onion or white onion or even shallots. The red onion won’t have as much flavour as white or yellow, but it works.

4. Add flour, stirring periodically for a few minutes. Do not let it brown, but just cook out the raw taste. Add garlic.

5. Add bouillon and milk. Increase heat to medium or medium-high or high, stirring until it bubbles and thickens. Reduce heat to low. I like to cook mine down to a thick sauce. Add onion and garlic powders.

6. Meanwhile, add other ingredients to a large mixing bowl.

7. Add ricotta and salt and pepper to sauce mixture and mix it into the vegetables, preferably while it’s still hot (this helps to wilt the spinach to make it easier to mix).

8. Mix remaining cheeses in a small bowl. Reserve a bit to mix with Shake’n bake topping.

9. Layer a single layer of lasagna noodles on bottom of the pan. Add about 1/3 or so of the vegetable mixture. Add 1/2 of the cheese mixture. Add another layer of pasta and repeat. I go 3 layers, ending with a layer of pasta with a thin layer of vegetable mixture and Shake’n Bake topping (this means 9 noodles total for me). (You can also mix Shake’n Bake with a bit of melted butter to help it brown, but it’s ok to do without, too, depending on whether you want a dry topping or a browned crispy buttered topping.) Make sure the pasta is covered by at least a little of the vegetable sauce mixture, or the uncovered part will dry out and be brown and crunchy and chewy.

10. Bake uncovered 25-45 minutes, until it is bubbly. Can even go an hour. At the 40 minute mark or so, if the top hasn’t browned enough yet everything is bubbling nicely, I turn on the broiler for 2 minutes until it does become brown and the lasagna is cooked all the way through.

11. Remove from oven. Let sit for at least 10 minutes before cutting into it. It can sit for longer and still be very warm. Enjoy!


“Probably closer to the Stouffer’s version – more cheese”

~3 T. butter. Ok if more.

2 T. flour

2 c. milk or half and half (10% cream in Canada)

1 Knorr bouillion cube, either chicken or vegetable, chopped

Dash onion powder

Dash garlic powder

1 garlic clove, crushed

1 small onion, diced

1 c. broccoli, diced

1 c. baby spinach

1 c. carrots, julienned

1/2 – 2/3 c. ricotta

1/2 c. parmesan, grated

1/2 c. romano, grated

1/2 c. mozzarella, grated

1/2 c. Asiago, grated

lasagna noodles (I use 9 for a long casserole dish)

Herb Parmesan Shake’n Bake

Salt and pepper

Assembly is same as above. Use less salt, since there are fewer vegetables. Be careful to reserve enough of the vegetable mixture in order to moisten the top layer of pasta. Because you’re using fewer vegetables, you might even be able to squeeze in another layer of pasta if you want. The baking time might be shorter, since it won’t be as full.


Notes (in no particular order):

1. Fresh spinach is much better than frozen. Frozen tends to disintegrate into a messy, muddy texture while having an overpowering flavour of spinach. If that’s all you have, go for it. If using regular spinach, chop it a bit. Baby spinach doesn’t need to be chopped.

2. Feel free to change the quantities according to your taste. I like broccoli, and find that using more broccoli and carrot to spinach ratio works just as well.

3. Depending on my mood, I will sometimes do the following tweaks:

a. Use only romano OR parmesan or even ignore the mozzarella altogether. Or use Asiago instead of mozzarella. Using just one of the aged cheeses gives you a tang, but not as much depth as you get when you use both. Asiago also adds a nice roundness. I like a creamy vegetable lasagna, which means more bechamel sauce and ricotta and less grated cheese.

b. Use more milk and cook it down, so there’s a thick sauce, but you have more sauce.

c. Use more ricotta to increase creaminess.

d. Puree some of the vegetable mixture. My child is at that wonderful stage of life in which she will only ingest fruit or vegetable if it’s pureed and preferably hidden. Ah, the joys of feeding a picky eater. So I will sometimes make her her own mini lasagna using the pureed vegetables. I add the the extra back to the rest of the mix.

e. Crumbled water crackers or bread crumbs mixed with melted butter and some of the cheese as a topping. So, I actually don’t usually like breadcrumb toppings on casseroles, which is why I use Shake’n Bake here. I find breadcrumbs will often gum up the dish when it gets soggy at the bottom layer, or just get in the way of the flavours I enjoy. They also don’t reheat well in the microwave, while the rest of this lasagna does freeze and reheat quite well. So if my husband really really wants it and I’m in the mood to humour him, I will sometimes crush water crackers, mix with melted butter and some cheese as the crunchy topping. I’ve tried panko, but didn’t like it. Making your own breadcrumbs from bakery bread is much better than store-bought, because the granules are bigger and give you a better texture, but do what you want. This is your lasagna!

4. I usually use a rectangular baking dish for this, but on the very rare occasion when I don’t have certain ingredients or if I don’t want many leftovers, I use a square baking pan.

5. Can be assembled ahead of time in the morning, chilled covered in fridge, and then put directly into the oven.

6. Do make sure to save some of the vegetable mixture to moisten the top layer of pasta, or it will dry out and curl and crunch. If you run out, mixing the few drops of sauce left with some more milk will sometimes do the job, but it’s nicer to use enough of the sauce mixture.

7. Yes, you still have to salt and pepper the vegetable mixture. You’re using a ton of vegetables, and they need to be seasoned, or the whole lasagna will taste bland despite the cheese and Shake’n Bake topping.

8. Leftovers freeze really well. I cut them into individual portions and reheat in microwave for homemade frozen lasagna. In my microwave, it takes about 10 minutes to reheat a slice from frozen.

9. You can bake the lasagna longer, but the longer you bake it, the drier it will get and the pasta will become softer and even mushy. So it depends on your taste. If you underbake it, the broccoli will be undercooked and crunchy.

10. It is much better to grate your own cheeses than to buy those packages of grated cheeses. Usually, they add things to the grated cheese to keep it from sticking together in the package, and this means it doesn’t melt as nicely as without it. Plus, you get a nice workout! Unless you use a food processor. But prepacked grated cheese is what you have, it totally works. No judgement. It’s just a tad nicer to grate your own, even though it’s a pain to do it. I’ve tried the 4 cheese Italiano grated cheese mixes, which contains provolone, and will sometimes use that instead of getting individual cheeses. But for this recipe, I prefer it without provolone, which to me doesn’t go as well with the bright, sweet, savory flavours. It’s also better to have a bit more of the parmesan or romano in the mix, as it will give you more tanginess to bring out the vegetables.

11. I sometimes use even more veggies than 2 cups each. It depends what will fit inside of your mixing bowl and then baking dish. They will shrink a bit as they cook, which is why I like pouring the heated sauce over the vegetables, to help them wilt a bit so I have a better sense of what it’s going to look like out of the oven. I don’t really measure anymore. Usually one huge head of broccoli or half a Costco package of florets is perfect, washed, peeled, and chopped well. A big tray of baby spinach, like the kind you get at Costco. And maybe 2 big carrots. A big onion (I like onion).

12. I have cut into a hot lasagna fresh out of the oven, but it won’t hold together and is too hot to eat right away. It will hold its shape better for cutting and presentation if you wait for it to cool down, usually about 10 minutes.

13. I’ve even tried using parmesan from those shaker containers, like Kraft or President’s Choice, but those almost powdered parmesan cheese sprinkles don’t melt as well as grated. I’d recommend using either grated, or grating your own rather than using canned cheese sprinkles. But if that’s all that you have, go for it.

14. The pasta matters. I prefer Barilla lasagna for this, or sometimes a wholewheat one. Use what you want, but be sure you cook it only until it’s a bit bendy but not yet al dente. Cheaper pasta won’t have a nice texture. Sometimes different brands are thinner, so you have to do 4 lasagna noodles to a layer instead of 3.

15. Don’t worry about being a purist and doing everything by hand. Use the food processor to jullienne and chop the vegetables if you prefer.

16. I use full-fat milk or even 10% cream here, as well as full-fat ricotta and cheeses. I’ve tried with reduced fat, but I myself prefer full fat. Do as you like, though.


Hope this was helpful. Enjoy! Share pics of how it turned out!

Read Full Post »

Tried and True Cookbook for Two in action!

I was shocked, shocked to hear my husband ordering pancakes at an Eggspectation instead of his usual blt. I had made pancakes for myself while he was away on business because I had thought that he didn’t like them. Well, I decided to make them this morning, to see if mine measured up to the restaurant’s. Also, it would use more buttermilk, which is always a good incentive.

I used a Martha Stewart recipe. I try to write down all of the recipes that I use (successfully, that is), so that I don’t have to resize it for two people. A full-sized binder was too large, and so far this half-sized binder has been working well for me. I had to do a little extra legwork to get the half-sized sheet protectors (ordered them online and had them delivered to a hotel we were staying at in Portland), but it was worth it.

frozen leftover bacon, wrapped in plastic wrap and foil

Since we were going to eat these as lunch instead of breakfast, I decided we needed some protein. I had some bacon saved in the freezer, which was just enough for the two of us. A full package of bacon is usually too big for two people, so I usually use what I need first, then freeze the rest in an accordion fold of plastic wrap so that the slices don’t touch each other, and wrap the package in foil. It freezes beautifully, and when I need to use it, I can just unfold and pry out one slice of bacon at a time. I also sometimes cook the whole package and freeze the unneeded cooked bacon. Usually, I cook the bacon in the oven. When I was just starting out, I used a small George Foreman grill, which I’ve since given away. It reminded me of the big cast iron skillet that my mother uses to make bacon, which had a reservoir on the side to collect the fat. Unfortunately, my little sandwich maker was not the same. The grease could drain out into the waiting plastic dish, however I found it inconvenient to empty that dish of hot fat in-process and the grill was too small for the bacon anyway- I had to curl each slice into an unattractive J. And they ended up slightly overcooked because I couldn’t control the heat.

unwrapping the frozen bacon to bake.

The best way that I’ve found to cook bacon, especially larger quantities of bacon like a whole package, is to bake it on a cookie sheet. The bacon is cooked all the way, it’s perfectly straight, and the clean up is the easiest. You don’t have to watch it and you don’t have to empty the baking sheet halfway through cooking, even for a whole package of bacon. I suppose it would be best to rest the slices on a rack while baking, but I’ve only recently acquired a wire rack small enough

crispy bacon! (yes, there were 5 slices. I couldn't resist and ate one right away - shhhh!)

to fit into the cookie sheet, and I don’t want to bother with the extra clean up work – baked-on grease is hard to clean off of racks! The bacon is fine and crispy if I drain it on paper towels immediately after cooking. I line the baking sheet with foil and arrange the bacon on top. It’s ok if they touch each other a little, since bacon shrinks when it’s cooked. It goes into a cold oven, which I then set to about 325F or even 300F. Bacon needs to be cooked slowly or it will burn before rending. Five slices took less than 30 minutes for slightly soft bacon, but more bacon takes longer.

First two pancakes.

I bought a cheap nonstick skillet specifically to make Chinese chive dumplings, which kept sticking to the bottom of the stainless steel Cuisinart skillet. I prefer to use the Cuisinart because the bottom is flatter and I don’t have to be as careful about avoiding scratching it. I decided to try using the nonstick pan for the pancakes because I couldn’t remember if the pancakes stick to the pan or not and I didn’t want to be embarrassed with nothing to feed my husband. When it was all done, I think I will use the Cuisinart next time, which cooks more evenly. I think that with enough grease, the pancakes won’t stick.

bacon and pancakes smothered in butter and maple syrup. Of course, the burnt one is on the top for the picture.

I started out using butter, but then decided to try using bacon fat from my freshly cooked bacon. I found that the ones fried with butter tasted like butter, but I couldn’t taste the bacon fat. The bacon fat also caused the pancakes to brown quicker than the butter pancakes. I kept the already made pancakes warm on a small plate in the oven on 175F. They tended to shrink a little and lose some of their fluffiness, but as long as the edges were a little crispy going into the oven, they stayed crispy. Of course, this final shot of the plated dish has the most burnt pancake on top. We enjoyed with butter and maple syrup.

this is what we have to put up with at every meal. all attempts with shooing and squirting with water have failed.

The cat tried to enjoy, too, but had to remain content with enjoying from a distance.

Read Full Post »

ingredients for the hot toddy. of course, forgot to include the whiskey in this group photo

After just a couple sips of alcohol, including beer, my cheeks turn red like they’re sunburned and I get a little drowsy. I’ve never been able to have more than 1/4 glass of anything, including low-alcohol beer. Of course, I ended up working in a wine shop at one point in my career…go figure.

white peppercorns, fresh ginger, cinnamon chunks, and green cardamom pods

For some reason or another, I’ve been thinking about hot toddies for the past few months. Probably during one of the especially cold, windy, and wet days picketing for four hours during the strike. But I digress. My parents never kept alcohol around the house except a bottle or two of wine for dinner parties, so I don’t have any experience with cocktails or hot toddies.

"They're like booze for dolls!" - Sookie Stackhouse. Cat keeping watch.

I scoured the web for a good hot toddy recipe, but they all recommended different things. I then decided to just use the same ingredients I use for chai: 3 smashed green cardamom pods, 2 smashed white peppercorns, 10 chunks cinnamon, fresh ginger, and boiling water. I brought all of these ingredients to a boil in a small pot, and simmered for a minute until very fragrant. Meanwhile, I poured about a tablespoon of whiskey in a mug. I don’t know anything about whiskey, and got three mini bottles that looked promising. Ok, the Calvados was supposed to be for tarte tatin or something similar. I strained the water over the whiskey because I don’t want to have to deal with spitting things out if they float to the top. I use giant tea balls when I make a pot of tea for guests so that the tea leaves can float around freely, but their hinges don’t last very long. Here, I’ve separated a broken tea ball and use the two halves as mini strainers. I mixed in a generous spoonful of honey and stirred.

boiling the ingredients. Note the holiday mug - for holiday cheer!

Now, I have Irish coffee glasses, but I opted for the more festive Christmas mug. I also have cinnamon sticks, but I think in this case the cinnamon chunks are more effective. If I were serving this to company, I’d probably use the coffee glass and the cinnamon stick, along with a slice of lemon.

strainer

It was nice. Not too much alcohol, though I think for my taste, even a 1/2 tablespoon would have been fine, too. Yes, I’m a total featherweight. I threw in a whole clove belatedly to see what would happen, and perhaps it helped. To my surprise, I did feel a bit more relaxed after a few sips, though it was not enough alcohol to turn my face red. The spices smelled great and the drink tasted like a nice holiday drink for a cold, wintery evening.

finished product. looks dubious in this photo, but I assure you that it was quite enjoyable.

Read Full Post »

Usually, when we roast a chicken, I debone it and store the meat in the freezer for later use. If I store it in the fridge, there’s a chance that it might not get used right away and it will go bad and then I will feel sad. I don’t cut up meat before freezing, because I don’t know what I’ll be using it for. Instead, I try to keep the pieces as large as possible to help delay freezer burn.

For two people eating the soup as a meal, I allow for about 5-6 cups broth, some of which will evaporate during cooking. As I mentioned in my previous post about turkey stock, I prefer to make my own stock. Even if I don’t have bones to simmer, I save the water after steaming vegetables and pour it all into one container in the freezer. It’s liquid that would have been thrown out, but is still tasty and it’s like making vegetable stock a few tablespoons at a time. Trust me, it adds up and it tastes great.

Bring the stock just to a boil and get all your ingredients ready – scrub them, peel and chop them, and then add them sequentially to the broth. Different vegetables take different times to cook. Case in point – if you add the peas at the same time as the carrots, the peas will end up brownish grey by the time the carrots are cooked. They’ll taste fine, but we eat with our eyes first and you want your soup to look as attractive as possible. Add any herbs you want. Usually, I add carrots, onion, and garlic next along with any tubers I might have and reduce the heat to a gentle simmer. Like making stock, I skim constantly, removing and discardig any scum or oil that floats to the top. After they’ve cooked for a short while, then comes the celery. Last are the peas and meat. Frozen peas take 30 seconds to boil and the meat just needs to be warmed up. Sometimes I just put the meat into the soup bowls first and pour the heated soup over it. I used about 1 cup of turkey meat for this. Roasted chicken or turkey is very tender and if I cook it in the soup with the vegetables, I’m worried it will get tough and chewy. Plus, it’s already cooked.

While this is all happening, and it will take about 20-25 minutes, I make a cup of orzo in a small pot and drain them when cooked. Mixing a little bit of turkey fat into the cooked orzo will keep it from sticking together and give it more turkey flavour. I don’t add it to the soup itself, because it gives me more control over serving time if I don’t. If you cook the orzo in the soup, it will make the soup starchy and will soak up all of your precious liquid so that the soup is just a soupy orzo salad. This is especially useful when you think you’ll have leftovers. Sometimes I use rice. Just to mix it up.

excellent homemade turkey soup, to which my husband exclaimed, "I'm sick of turkey!" ...ungrateful wretch...

When it comes time to assemble, I sprinkle the soup bowls with fresh herbs like dill or chives. Then spoon in several heaping spoonfuls of orzo and if I haven’t added it already, shredded or cubed meat. Then I spoon out the hot soup over it all, which heats everything up. In order to make it into a meal, I made sure to use a lot of ingredients in the soup. It’s great for cold winter nights and feels really healthy to eat because it’s mostly vegetables with practically no fat.

Read Full Post »

I’m counting this as a dish, even though we never consume it as its own dish. Homemade stocks are easy to make and they are delicious. It’s so much nicer to have a homemade stock for…well, for everything. You know exactly what is in it, you’ve controlled the seasoning, you feel really great because you made your own stock, and it impresses everyone you brag to about it because they think that making homemade stock is really hard. It’s not.

I was going to gift myself with a new stock pot this year, but haven’t yet gotten around to it. Just like how I was going to gift myself with a new set of knives last year. My current one was $10 at a grocery store and my mother gave me hell about buying it because it was so cheaply made. Hey, I was fresh out of college then and was holding down four jobs to support myself – investing$100-400 in a “good” stock pot wasn’t high on my priorities. Now we have a flat-top stove (not induction, just flat-top) and the pot doesn’t work very well because the thin bottom has warped unevenly. If it’s less than 1/3 full, I have to blast it on high and hold it down in order for it to warm up. But if we end up moving to a place that has a gas stove it’ll work fine again. Also, we have a tiny sink and washing a large, heavy stock pot would be a chore. (Shhh…don’t tell Santa…)

Anyway, I used to make my own stocks even when I was living alone. I would save my roasted chicken carcasses (remember, almost one chicken each week), and when I got two or three I would make stock. They were small chickens. Anyway, the method I’ve developed is thus:

my arsenal of dried herbs and spices. yes, the entire top shelf is from Penzeys.

Throw your spices and herbs into the pot first. Usually cookbooks recommend you tie the spices and herbs into cheesecloth as a bouquet garni, but I’ve never bothered to do that. Firstly, I hate using cheesecloth. When I first started cooking seriously, I used to use it to strain my stocks and tie those little bouquet garnis…but cheesecloth is a pain. You have to keep it around and I never wanted to save them to wash them, so it was a big waste. I now use a clean flour sack towel to strain my stocks. More on that below. Secondly, if you use dried spices, they tend to slip out of the cheesecloth. Thirdly, you’re going to have bits of vegetable and chicken floating around anyway, so some free-flowing herbs aren’t going to matter. If you add the herbs and spices in first, and pile everything on top, I’ve reasoned that the rest of the stuff will keep most of the herbs and spices from floating around to the top. It works for me. I usually use the following, but it varies and everyone has their own tastes:

  • whole peppercorns. I’ve been using green peppercorns lately, but anything will do for poultry
  • several shakes of dried red chili pepper, like the kind you put on pizza. I find it perks up the stock.
  • fresh herbs if I have them, or dried. Usually thyme, rosemary, sage. Parsley and dill if I have it, but it’s not necesary if I don’t.
  • Bay leaves
  • Fresh garlic. Ok, not an herb, but it keeps it from floating to the top.
  • Fresh ginger. Just stick a chunk in about the size of a thumb.
  • Celery seeds if I don’t have celery

Why no salt? The carcass will already be salty because I use a lot of salt when I roast. Also, it’s usually best to wait to add salt until you’re at least halfway through the cooking process. The liquid will reduce, and if you add it too early, you might end up with a saltier stock than you’d like. Then I add the poultry carcass, including any skin. I broke down the turkey carcass into about eight pieces so they would comfortably fit into the pot. I want everything to be covered by water, and didn’t want drumsticks jutting out of the pot.

Then I add the vegetables, lighter ones on the bottom and heavier ones on top, again to weight everything down. I used the following this time:

  • Tomato paste, since tomatoes aren’t in season
  • 3 small onions, halved. I sometimes use leeks as well, but not this time.
  • 3 medium carrots, halved on a slant
  • 2 stalks celery, halved
  • 1/2 a rutebega, cut into large hunks. This helps give the stock body.
  • Leftover shitake mushroom stalks that I had saved when I had made stuffing

cheap stock pot filled to the brim. note the wire rack holding everything down.

I added a small dash of white wine, which is supposed to help unlock the tomato flavour – I can’t remember details, but I saw something about it on Good Eats. Less is more with wine here, because you can really taste it and you don’t want the wine to overpower all the hard work you put into your stock. You can booze it up later on when you make caramelized onion soup or risotto.

Then I added a lot of water, perhaps 1.5 gallons. Water evaporates during the cooking process; recently I made stock out of a small chicken carcass, using about three cups of water, and ended up with only 1/2 a cup of stock! So this time I filled the pot just about to the top.

collected scum. I ended up removing about 1.5 cups of scum.

I turned the heat to high (since I was using the cheap pot), and waited until it came to a gentle boil, then reduced the heat to a gentle simmer. Because I like a very clear stock, it’s important to keep the temperature low (still cooking, but few bubbles) and I am a determined skimmer. People say that you only have to skim during the first 15-30 minutes, but I skim during the entire cooking process. To skim, I use a large flat spoon to scrape and remove the oil and scum and foam that collects at the top of the pot. It’s important to do this frequently and thoroughly, or the scum will cloud the stock and it will taste muddy or slightly turned or not as pure as if you had skimmed. It might seem like you’re taking out quite a lot of the stock itself when you skim, but that’s one of the reasons why I use so much water in the first place. When you start skimming, you’ll understand why I’ve thought so much about weighing down all the little bits so they don’t float around to the top and get skimmed off with the scum.

It’s up to you as to how long you let a stock simmer. Some do it for hours and hours, but if you’re impatient, about an hour is the minimum for poultry. I let the turkey stock go for three hours, including warm-up time. I tasted the stock a couple of times, and added salt.

vegetables removed and draining. note the receding tide line of the stock.The stock will stay hot for a long time even after turning off the heat. I removed the spent vegetables first with a slotted spoon and let them draining and cool in a colander nested in a large mixing bowl for about 30 minutes. I’m not kidding – the pieces are big and they take a long time to cool. If you chop stock vegetables too small, they will disintegrate in your stock and make it cloudy. I did several loads of laundry during this cooking process, so I wasn’t just standing around waiting for them to cool. Why not just dump all the hot stuff straight into the garbage bin? Well, first of all, it still has a lot of moisture. It will steam up your garbage, make everything smell, and the moisture from the steam will encourage mildew to fester in your garbage. Ew. Secondly, it still has a lot of moisture, meaning it still has stock locked up inside of it. When I finally dumped out the used vegetable bits, I had at least a half cup of stock which had drained out the bottom. Then I removed the bones and rest of the stuff. It also took about 30 minutes to cool and drain. When I had removed all the pieces I could, I then lined the colander with a clean flour sack towel and strained the stock through it into a large bowl. I did this three or four times.

bones removed and cooling/draining. note the level of the stock.

I don’t usually use fabric softener and never on towels anymore. When we lived in Rhode Island, we had to share the duplex’s dryer with our landlords, who were kind of but not completely ok with our sharing it with them (it wasn’t us, the thing kept breaking down on them, but they were still trying to baby it along and use it as little as possible to avoid getting a new one). So I used the outside clothes line as much as possible, and especially for towels. I’d finish them for 10-15 minutes in the dryer to make them fluffy. After that experience, I found that I really didn’t miss fabric softener on towels, or a

flour sack towel caught all the little bits leftover

nything else. Since we use fragrance-free, gentle detergent, I don’t worry about using the cotton flour sack towels as strainers, biscuit covers, or paper towel substitutes. If the food stains them, I can always run them through the wash twice (once on hot with towels and again on warm with light colours if necessary) to get them out. I find that using flour sack towels also encourages me to cook more, because I don’t feel as wasteful using a lot of paper towels for everything. They can’t replace everything, as I learned when I tried to run one through the can opener to clean it, and ended up creating holes. It’s a lifestyle choice, but I do strongly advocate the use of flour sack towels, which can be purchase inexpensively online.

So, back to the stock. The flour sack towel caught all of the little bits leftover, like the dried spices and the tomato paste particles. I squeezed out the towel to get

beautiful golden turkey stock to be frozen.

the last of the juices, and admired my handiwork. I was left with about a gallon of clear, beautiful dark golden turkey stock. Why this obsession with a clear stock? I find that when I am sick, I am super sensitive to even the smell of grease or oil and I want to have very clear soups with zero fat in it. I’m not often sick, but it’s good to be prepared. I associate cloudy stocks with unknown contaminates and don’t trust them as much as I would a clear stock.

homemade turkey stock, about to become homemade turkey soup

Usually, I freeze stock in 2-3 cup containers which can easily be used later. Since its winter and I’ll definitely make soup later on, I froze one large container and a small container with the leftover. Turkey stock freezes very well and it relieves me of the pressure of using the stock right away, as I would if I stored it in the fridge. Since my stock is very clear, I feel like it keeps longer than a cloudy stock. Nothing is worse than going through this day-long process of making stock, and find out that your stock tastes rancid or muddy, as has happened to me when I attempted to make stocks out of rock crab carcasses. I made turkey soup right away with the remainder. Note to self: rutabaga is great in stock, but less interesting as a component in turkey soup.

Now, is it economically worth it to make homemade stock, when a can of stock is just $.99? Or those little cubes of bouillon are ~$.25 each? I say yes. The carcass would otherwise be thrown out, and if you keep a stocked fridge the old vegetables would also have been discarded. I have the advantage of the incredibly inexpensive public markets at my disposal, where a 10 lb. bag of carrots or onions is $3-$5, so I’d say yes, even with vegetables a stock is worth the effort and cost. If you don’t have vegetables around, even just making a stock out of a carcass and some salt and pepper is nice. A homemade stock has a greater depth of flavour than a canned stock and it’s really not hard or expensive to make.

Of course, if I don’t have homemade stock around, I do resort to those canned broths and those little bouillon cubes, but my preference is always for my own product.

Read Full Post »

I made this on Christmas Day using leftover turkey. I use Martha Stewart’s chicken pot pie recipe, but I’ve adjusted it to my own tastes. I really like mushrooms, and put them in everything. This isn’t an easy recipe for those who don’t cook a lot, as it requires multiple steps and a ton of dishes, but the end result is delicious so I suppose it’s worth it. I’ve never tried another chicken pot pie recipe, so perhaps it’s time to try something different.

Chicken pot pie

Based on Martha Stewart recipe April 2007 \ from Chef John Delucie

Serves: 3 people

2 boneless, skinless chicken breast halves

1 med onion, coarsely chopped

2 ribs celery, cut into 1-inch pieces

3 carrots, coarsely chopped

Coarse salt and pepper

4 sprigs fresh thyme

2 cloves garlic, crushed

½ c. carrots, peeled, med chop (~1 carrot)

½ c. frozen green peas

½ c. onion, med chop

½ c. celery, med chop

3 T. plus 1 T unsalted butter

1 ¼ c. cremini mushrooms, trimmed and cut into quarters

3 T. all-purpose flour

1 ½ c. half & half

1 t. hot pepper flakes

1 ½ t. Worcestershire sauce

1 large egg, beaten

Pie crust

  • Place chicken, onion, celery, and carrots in a large stockpot; season with salt and pepper and enough water to cover (~2 c.). Wrap thyme and garlic in a piece of cheesecloth and tie with kitchen twine to enclose; add to pot. Cover and bring to a boil, then reduce heat to a simmer and cook until chicken is no longer pink, ~ 25 min.. Discard vegetables; reserve chicken and liquids separately; set aside.
  • Preheat oven to 425°F.
  • Meanwhile, bring a small pot of salted water to a boil (don’t over salt – save later as veggie stock) and prepare an ice-water bath. Cook in the boiling water for the following times:
    • Carrots –  2 min.
    • Peas –   ~30 sec.
    • Onions –  1 min.
    • Celery –  30 sec.
  • Drain and immediately shock in the ice-water bath. Drain; set aside in a large non-reactive bowl.
  • Heat 1 t. butter in a medium skillet over medium heat. Brown mushrooms, 3 to 4 min.; add to other veggies.
  • Cut chicken into bite-size pieces and add to veggies.
  • In a medium skillet on med-low heat, melt remaining 3 T. butter. Add flour and cook, stirring, for 1-2 min.. Add ½ c. of the reserved cooking liquid and half and half. Cook, stirring constantly, until liquid comes to a boil. Reduce heat to a simmer and cook for 2 min.. Remove from heat and add pepper flakes and Worcestershire sauce; season with salt and pepper. Add to bowl with chicken and vegetables; toss to combine.
  • Make pie crust.
  • Spoon filling into a large soufflé dish or pie pan. Roll pie crust onto top. Cut a slit in the center of the puff pastry to allow steam to escape; brush beaten egg over puff pastry.
  • Bake until pastry is golden brown and filling is bubbling, ~ 25 min.. Let stand 5 min. before serving.


Notes:

  • skip first part if have chicken stock/drippings and cooked chicken on hand (but add thyme later)
  • can substitute roasted chicken drippings for chicken stock (be very careful with seasoning)

I usually skip the first part and use leftover chicken from for this, since I keep stock handy so I don’t necessarily need the broth gotten from boiled chicken. I used about 2 cups of leftover turkey, cubed.

I always forget to make ice ahead of time. I don’t use ice in my drinks, and don’t usually keep it around, but if I can think ahead for this dish, I freeze a two cup block of ice to use in ice water for shocking vegetables. Otherwise, since it’s winter, I can run cold water over each addition of vegetables, but that’s wasteful and more trouble than just having a nice block of ice.

mixing the sauce with the vegetables and turkey.

It’s important to partially cook these vegetables first before baking the pie. I decided to add a potato this time to make it heartier, knowing I’d have leftovers that are often crustless. However, I only added the cubed potato when the sauce was already done, and even after baking to a golden crust and bubbly insides, the potato bits were still crunchy. Oops. They’ll be fully cooked when microwaved next week for lunch at work. Next time, I’ll add the potatoes at the beginning of the sauce process, when I add the half and half. That should give it enough time to partially cook, since I take a while between that step and baking in order to make the crust.

I forgot to get mushrooms, and used sliced leftover hydrated shitake mushrooms instead. Turned out fine.

turkey pot pie, enjoyment in process

I use my father-in-law’s recipe for pie pastry. It’s so much better if the crust is homemade. A homemade crust is flakier, more tender, and just overall better than a premade crust. It’s an extra step, but they’re really not that hard. Use shortening NOT butter. You’d think that you’d want a buttery crust, but butter just makes it heavy. If you really must use butter, use mostly shortening with just a tablespoon or two of butter. Really, though, it’s just as “buttery” if you use only shortening. Or lard. But I haven’t tried lard yet myself, so I’ll just write about shortening. And don’t over mix the dough. Mix all the dry ingredients (flour, salt), then cut in the shortening using a pastry cutter or two knives until it has the consistency of coarse cornmeal. Then gradually add ice cold water until it holds together in a ball. Don’t add too much water and only mix it just until it comes together. If you overmix, you’ll use too much water and it will turn rock hard when baked and it will not be flaky. The goal is always a tender, flaky crust. Ok, it’s not so much flakey as it is tender. Apparently you need to rub the shortening into the flour if you want a truly flaky crust. I haven’t yet mastered this skill, but I’ve seen my father-in-law do it quite successfully. I’m satisfied with just using a pastry cutter for now.

I don’t use a bottom crust on chicken pot pie. I’ve found that it gets too soggy to be enjoyable, and the top crust is just enough for two people. I tuck the pie dough inside the pie dish, so that it doesn’t hang over the sides, which makes it hard to handle. The filling always bubbles over a little bit, so I place a sheet of foil underneath it.

Read Full Post »

Last year, I saw the most gorgeous turkey breast recipe on the NYTimes website on a holiday slideshow, and went so far as to email the newspaper to request the recipe. They sent me the link to it, and I carefully filed it away for future use.

I’d been craving turkey before the holidays at the beginning of December, but didn’t have enough people to warrant getting a whole bird. So I brought out the Torrisi Turkey recipe. I had to settle for a small 1 lb. turkey breast, but only halved the glaze recipe. It was my first time using a brine, which turned the cooked turkey breast into a deli meat-like consistency. And when it came down to coating the breast with the glaze, it all fell off! I did not get the gorgeous golden layer of glaze that the picture had. It still flavoured the breast, and I tried to coax more on top during the roasting process, but I was disappointed that it didn’t look like the picture. Perhaps I need to use a special thickened honey next time.

In the end, we decided that the recipe was too much trouble for too little gain for two people. Perhaps if I had been making multiple turkey breasts, it would have been more worthwhile.

Read Full Post »